wpadmin
Adding Images
When the web was first created, it was a world of words – text abounded. As computers and networks got faster, images were added, making the web a much more beautiful and colorful place. Images are a common part of all web sites and, when used thoughtfully, can make a world of difference for your web page or blog post.
In html, images are included using the img tag. The img tag is one of those special tags that does not need a closing tag as everything it needs to know is in the tag itself:
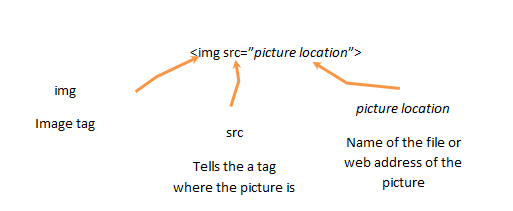
The img tag uses the src attribute to tell the computer where to find the picture. The picture location can be one of two things. The picture location can be the name of a file on the computer. Or it can be a web address of a picture. (Note – be sure you have permission before you use someone else’s picture!)
For example, there is picture located on this web server called “/wp-content/uploads/2013/04/j2elogo.png”:
<img src=”/wp-content/uploads/2013/04/j2elogo.png”>
which displays:

You can also reference images on other sites. For example, to link to the picture of the squirrel monkey in Wikipedia located at http://upload.wikimedia.org/wikipedia/commons/thumb/2/20/Saimiri_sciureus-1_Luc_Viatour.jpg/320px-Saimiri_sciureus-1_Luc_Viatour.jpg, the following img tag is used:
<img src=”http://upload.wikimedia.org/wikipedia/commons/thumb/2/20/Saimiri_sciureus-1_Luc_Viatour.jpg/320px-Saimiri_sciureus-1_Luc_Viatour.jpg”>
showing this cute picture:

Most web editors provide a way to upload and insert images. These tools will often resize images for you so this is the preferred method. However, if you need to link to a picture from a vendor web site, the img tag can be a great resource!
Linking to Web Pages
Why is the web called the web? Because things are connect together, just like a web connects at many points to create a whole. Links are an important part of the web and linking to other web pages and resources is not only possible but expected. Links are creating using a tag called the anchor tag (<a>). Why anchor? My best guess is because it ties something in place? Why the letter a? They made it short so you would use it alot!
The anchor tag is a little different. It has some extra information in the tag:
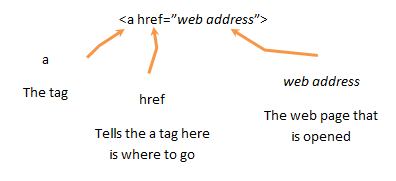
Note that after the a in the tag come some additonal information. The a tag uses an href attribute to tell the link where to go. The web address is the page that is open. The web address is the same information you see in the address bar of your web browser.
The link that is displayed on the web page is whatever is between the opening and closing anchor tag: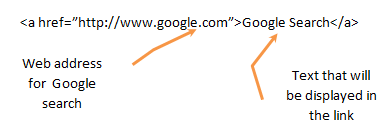
So, in this example the words Google Search are linked to http://www.google.com which will open the Google Search page:
If I change the href from http://www.google.com to http://www.bing.com then Google Search will open bing:
So, the text between the opening and closing anchor tag has not impact on where the link goes. That is purely up to what is set as the web address of the href.
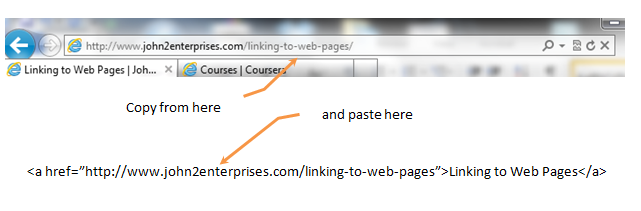
How do you find the link? The easiest way is to copy from the top of your web browser:
Linking with Images
A picture is worth a 1000 words and no one wants to see a 1000 words in a link. To create a link using a picture, the text is replaced with an <img> tag:
<a href=”http://www.google.com”><img src=”http://www.google.com/images/srpr/logo4w.png”></a>
So, when the image is clicked, the Google web page is displayed:

Want to know more about images, check out Adding Images.
Styling Tags
One of the great things about web pages is the ability to style text. Things such as bold and italics help bring focus to text while adding a line break or indentation in the right spot can also draw quite a bit of attention. Many tools, such as WordPress, provide the ability to use editing tools that are similar to a word processor such as Word. Sometimes, though, it can be difficult to get that section of text highlighted just right.
You can do some pretty cool formatting by just learning four tags:
- bold – <strong>
- italics – <em> (emphasize)
- line break – <br>
- indent – <blockquote>
Bold (<strong>)
First, the <strong> tag provides the ability to draw attention to make text appear stronger, which translates to bold. For example, to make bring more attention to the statement:
For writing to be effective, you must often make bold statements.
Adding the <strong> tag:
<p>For writing to be effective, you must often make <strong>bold statements</bold>.</p>
Yields:
For writing to be effective, you must often make bold statements.
Italics (<em>)
Another common way to draw attention text is to use italics. The <em> tag (called emphasize) will draw attention to text in italics. So, using the sample text:
It is important to empahsize what you are seeing not only with words but with style.
Adding the <em> tag:
<p>It is important to <em>empahsize what you are seeing</em> not only with words but with style.</p>
Yields:
It is important to empahsize what you are seeing not only with words but with style.
Line Break (<br>)
One frusturation when editing blog posts and web pages in an editing tools is line space. Using the tool usually creates an extra line, so you get:
one
two
three
The problem is that the editor treats every line as if its a separate paragraph. Thus, the web editor creates the code:
<p>one</p>
<p>two</p>
<p>three</p>
To create a single spaced list, you change the code to:
<p>one<br>
two<br>
three</p>
And see:
one
two
three
Anywhere you add a <br> tag, a new line will be started there!
(Note – the <br> is one of those special tags does not require a closing tag!)
Indent (<blockquote>)
As you may have notice throughout the three previous sections, the examples are all indented. While web editors may use different methods for indenting, one easy way is the <blockquote> tag. When a section of text is placed in a <blockquote> the text (or images or video) is shifted to the left. So, text on the left such as:
Here is some text on the left.
can be easily shifted using <blockquote>:
<blockquote>Here is some text on the left.</blockquote>
becomes:
Here is some text on the left.
For more information on <strong>, <em>, <br> and <blockquote>, check out this pages on W3Schools.com:
Using Tags
What is a tag? In HTML, a tag is a way to tell the computer where part of the web page begins and ends. (The tag is the Markup in Hyper Text Markup Language.) A tag is not much different than how you read. When you see a capital letter, you first think it is the beginning of a sentence. This is confirmed when it ends with a period. If several words are capitalize, you realize it may just be a title, such as Hyper Text Markup Language. Within the sentence, words are recognized by their spaces.
The computer is not as smart as you. It is really just a souped up calculator. To make things easier for the computer, tags provide a very explicity way to tell the computer what it should care about. A tag has three parts:
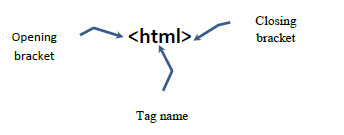
- A tag starts with a a left angle bracket (or as most of us learned it, the less than sign).
- Next is the tag itself. (html is the first tag of all web pages.)
- Finally, it is ended with a right angle bracket (aka greater than sign).
This first tag is called the opening tag. It tells the computer where things start. In this case, it tells where the beginning of the web page is. The computer stops looking after it comes to closing tag. The closing tag is as follows:
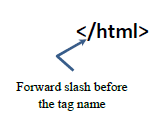
Note the only difference is the forward slash before the tag name. This tells the computer you are done with this.
Web pages use many different tags. Here is a very basic web page:
<html>
<body>
<p>This is a paragraph.</p>
</body>
</html>
Note that new tags start before other tags begin. Also note these new tags also close before the old tags. The way the computer sees it is this:
- Oh, here is the beginning of a web page (html tag).
- Now here is the start of the body of the web page (body tag).
- Okay, now I have a paragraph starting (p tag).
- Then there is actually some content.
- Okay, now I am done with that paragrapah (/p tag). Better through in a line after this one is done.
- I am so done with the body now that I found the closing tag. (/body tag)
- Finally, I can take a break – the web page is done. (/html)
Whew, this can seem a little overwhelming. The two important things to remember are:
- Tags must open and close.*
- A tags cannot overlap. Tags are inside. In other words, the body tag inside the html tag must be closed (/body tag) before the html tag is closed (/html).
(*Okay, I hate to be the one to break it to you but there are a few tags that do not need to be closed. The most common are <br> and <img>. But this is the exception.)